Screw Thread Machining & Strength Calculator
(Class Tolerances)
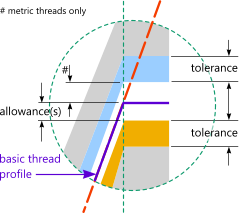
Fig 1. Tolerances & Clearances
CalQlata refers to the Nut as the 'internal' thread and the Screw as the 'external' thread. Clearance(s) and tolerances (Fig 1) for each are relative to the basic thread profile (Figs 1 & 2) as described in CalQlata's Threads technical help page. Refer to Fig 1 for colour coding in the diagrams and text on this page.
Whilst all references to 'Imperial' threads on this page are based upon US Unified Standards, they apply equally well to British Imperial threads such as Whitworth (BSW), Fine (BSF), Association (BA), etc. and may be applied accordingly.
'Class' refers to the metal condition (somewhere between maximum and minimum) of the machined screw or nut that will define its tightness of fit.
Screw Threads
Virtually all M-Type helical screw threads have the same basic thread profile the only differences being the minimum mandatory clearance(s), machining tolerances and root radii limitations that are applied according to each regulatory specification or design standard.
The only significant difference between metric and Imperial threads of this type is the alternative allowable root configurations (Fig 3). I.e.:
a) Imperial threads allow sharp roots in internal threads, which is perfectly reasonable as there is no risk of material failure in this area from a stress concentration. And;
b) Metric threads allow for flat bottom external thread roots which is also perfectly reasonable as it must be accompanied by minimum blend radii thereby minimising the stress concentration in the screw where it would otherwise be detrimental.
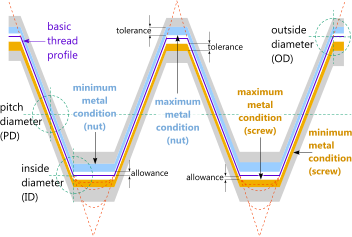
Fig 2. Screw Thread Machining (full form)
As a general rule, root radii limitations are as follows:
R₁ and R₂ (Fig 3) must be greater than ⅛th the pitch
R₂ can be as large as you like so long as the minimum truncation (T, Fig 3) is exceeded: i.e. T₁ & T₂ & T₃ > 0.14434H
Whilst there is also a maximum truncation clearance it is of little importance because you need to ensure a clearance between the root and the opposing crest.
Clearance
Alternative terms are; 'allowance', 'fundamental deviation', 'position', 'minimum clearance', 'tolerance position', 'gap' and 'maximum metal condition' (MMC+)
The 'clearance(s)', where provided/imposed, are a fixed gap that guarantees a clearance between any and all internal and external threads of the same design and size. This clearance alone (with zero tolerances) represents the maximum metal condition (MMC+) of the threaded assembly.
A clearance is applied only to the external thread of Imperial specifications.
A clearance is applied to both internal and external metric threads.
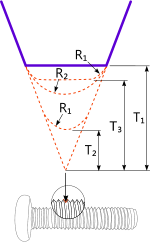
Fig 3. Permissible Root Forms
Tolerance
Alternative terms are; 'tolerance grade', 'tolerance zone', 'tolerance band' and 'tolerance width'
Machining tolerances are applied to accommodate dimensional variations in batch or mass production (see CalQlata's Limits & Fits technical help page).
The 'tolerance' represents the difference between the maximum and minimum machining limits permitted by a given design code ensuring compliance with the strength and/or assembly requirements for any specified Class of fit between internal and external threads of the same design and size. Maximum tolerance represents the minimum metal condition (MMC-) of the threaded assembly.
Tolerances are applied to external and internal threads of both Imperial and metric specifications.
Class of Fit
Screw threads are used for location, strength or movement objectives, all of which require different levels of relative clearance between internal and external threads. MMC- represents the loosest fit and consequently the easiest assembly and lowest strength. MMC+ represents the tightest fit and consequently the most difficult assembly and the highest strength.
Imperial Class Designation (UN & BS)
Unified classes use the letter A for external threads and 'B' for internal threads. The number 3 represents the tightest fit and the number 1 represents the loosest fit. All of which apply to the pitch diameter. The 'clearance' provided in classes 1 & 2 may be used to accommodate plating and/or coating.
Class 1A & 1B: A clearance is applied to the basic thread profile before tolerances are applied and this class has the largest tolerances. Together with the clearance, this class of thread is suitable for easy assembly even when dirty and/or damaged making it ideal for general field weaponry equipment.
Class 2A & 2B: The same clearance as that applied to Class 1A/1B threads is also applied to the basic thread profile of this class but the tolerances for this class are tighter making this class of thread more vulnerable to damage. This class of thread is used for general engineering applications where a compromise of strength and assembly is necessary.
Class 3A & 3B: No clearance is applied to the basic thread profile of this class of thread and the tolerances are tighter even than class 2A/2B. This class of thread is used for applications where strength and/or precision are of overall importance. MMC+ can result in an interference fit.
Combined Classes (Imperial)It may occasionally be useful (or appropriate) to combine classes where, for example, you need to protect the internal thread but not the external thread, such as a cylinder head in a car engine where a damaged internal thread would be unacceptable but replacement studs are not a problem. In such a situation it would be prudent to ensure that the material strength and hardness of the internal thread are greater than the external thread and also the tightest class (3B), whereas the stud could be machined to class 2A dimensions for easier assembly.
Metric Class Designation (M)
There are considerably more metric class options than Imperial, all of which comprise a number (3 to 9) and a letter (e to h) similar in concept to the system for general machining tolerances (see CalQlata's Limits & Fits calculator).
external threads are differentiated by lower-case letters and internal threads are differentiated by upper-case letters (Fig 4). Designations in Bold Type (below) generally apply to normal lengths of thread engagement:
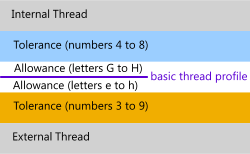
Fig 4. Tolerances and Clearances
internal
Clearance G, H
Tolerance;
Minor diameter (ID) 4, 5, 6, 7, 8
Pitch diameter (PD) 4, 5, 6, 7, 8
external:
Clearance e, f, g, h
Tolerance;
Major diameter (OD) 4, 6, 8
Pitch diameter (PD) 3, 4, 5, 6, 7, 8, 9
The lower the number the smaller the machining tolerance (tighter the fit) and shorter expected length of thread engagement.
The lower the letter the greater the clearance ('H' and 'h' both represent zero clearance).
Metric threads provide for the additional class variation of the major diameter of external threads and the minor diameter of internal diameters as well as their pitch diameters.
5H6H/4g6g applies to: [pitch diameter][minor diameter] / [pitch diameter][major diameter]
5H/4g applies to [pitch diameter] / [pitch diameter]
6H applies to [pitch diameter] {both internal and external threads being the same tolerance grade and position}
Combined Classes (metric)Given the range of metric tolerances available (especially for external threads), where possible, you should apply the tightest tolerances to external threads because they are more easily controlled (machined). As such, unless you have special requirements or special machining facilities, you should normally apply a 5G tolerance to most internal threads and establish the fit by adjusting the tolerance/clearance of the external thread.
However, as discussed above (Imperial: Combined Classes) where damage to the internal thread will result in serious consequences it is always better to machine the internal thread to MMC+ and adjust the external thread to suit.
Screw Thread Class Calculator - Technical Help
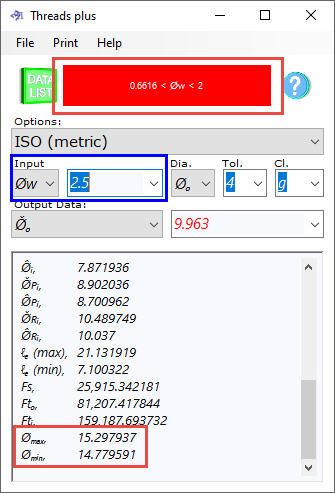
Fig 5. Tolerances Measurement Using Wires
Length of Engagement
The length of engagement (between internal and external threads) is important for thread strength as opposed to screw (or bolt) strength, which is dependent upon the cross-sectional area of the screw at the root of the thread. The tighter the fit, the shorter the length of engagement for a given level of thread strength. When a thread fails it will shear (strip) from the nut or screw body.
Metric
The maximum and minimum lengths of thread engagement are calculated according to the formulas provided in ISO standard 965-1, the normal (or nominal) length of engagement being mid-way between the two. However, if you have an actual length of engagement for which you would like to calculate a strength for the screw thread then you should enter a value for LE (length of engagement) otherwise simply leave the value blank or enter zero (0).
Imperial
ASME has abandoned the engagement length calculation because of confusion in its use. As such, you simply enter the expected length of engagement and Threads+ will calculate the required class (dimensions) for the optimised screw strength.
Thread Measurement
Thread measurements can be made either using special micrometers, or a standard micrometer across wires inserted into the thread. The wire calculation results ('Øₘₐₓ and Øₘᵢₙ') are provided for measurement using a standard micrometer and wires.
If an unsuitable wire diameter (Øw) is entered, a warning will appear at the top of the window displaying the min-max wire diameter range permissible for the thread selected.
'Øₘₐₓ' is the maximum permissible measurement across wires of the diameter entered according to the associated code tolerances for the class of fit.
'Øₘᵢₙ' is the minimum permissible measurement across wires of the diameter entered according to the associated code tolerances for the class of fit.
Because it can be misleading to include the thread angle tolerance in the measurement across wires for diametral tolerances, and because tool-tip angles are easily measured; you are asked to enter the thread angle (θ) value manually.
Half-angular (θ/2) tolerances are as follows:
Metric: Grade 4; P≤0.45 = ±2°; 0.45<P≤1.75 = ±1°; P>1.75 = ±0°
Metric: Grade 6; P≤0.45 = ±3°; 0.45<P≤1.0 = ±2°; 1.0<P≤4.5 = ±1°; P>4.5 = ±0°
Imperial: TPI≤14 = ±0°; 14<TPI≤44 = ±1°; 44<TPI≤72 = ±2°; TPI>72 = ±3° (Fig 5)
Accuracy
Threads+ does not simply reproduce the numbers listed in any table or value list, it calculates all clearances and tolerances using similar formulas to those in the relevant specification but it does not round off the results. As such you will no doubt notice some minor discrepancies between the values calculated in Threads+ and the tabulated values provided in the relevant standards (in particular for the larger diameter threads).
This does not render inaccurate the values in either Threads+ or the standards. It simply shows that the tabulated values in the standards are not all exactly according to their own formulas.
Notes:
1) The factor '0.18' in the formula for 'major diameter tolerance' of external threads in Ref(24) paragraph 6.5.2 has been modified to '0.1818' in order to reduce the differences between calculated and tabulated values. This has produced a difference between the results from the documented formula and CalQlata's modified formula for 'minimum major diameter' of external threads: e.g. 0.013% in Thread Ø:16mm x P:2mm.
2) You may notice a greater difference than that defined in note 1) above for some (but not all) of the calculated and tabulated values for minimum major diameter of external threads: e.g. Ø:16mm x P:2mm where there is a difference of 0.032%. As CalQlata has carried out internal verification of Threads+ output data according to the formula this discrepancy will remain for some threads.
Further Reading
You will find further reading on this subject in reference publications(2, 24 & 25)

