Stress Concentration (factor) Calculator
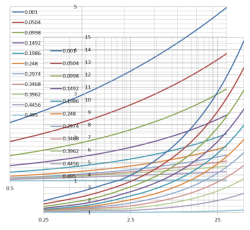
Fig 1. Stress Concentration Plots
'Stress Concentration' is an intensification of stress (or stresses) in a load bearing member as a result of a localised discontinuity in its shape or a change in the material from which it is made (Stress Concentration calculates the concentrations associated with shape discontinuities only⁽¹⁾). The intensity of the concentration is dependent upon the acuteness of the discontinuity and the type(s) of stress induced, shear, bending, tensile, etc.
To apply a concentration factor you simply multiply the calculated evenly distributed stress by the concentration factor; σ = K.σ
Credibility
There is no certainty regarding the accuracy of calculated stress concentrations as opposed to empirically established values⁽²⁾ and this uncertainty applies to all calculated values, not just those used in the stress concentration calculator. CalQlata has used well established formulas in this calculator and analogous trends have been mapped and compared with plots provided in various publications⁽³⁾ (Fig 1). Whilst many of these publications claim accuracy levels of between ±5% to 10%, we suspect that such claims are so dependent upon the accuracy of the shape and material homogeneity that they should only be regarded as the basis for initial design. Final designs should always be based upon representative physical testing.
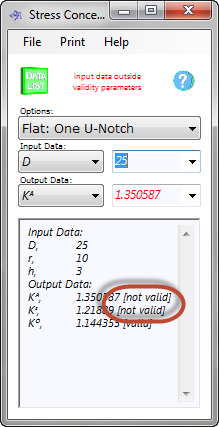
Fig 2. Calculation Validity
Stress Concentration Calculator - Technical help
Units
You may use any units you like, but you must be consistent.
Validity
Where "not valid" appears next to a result in the Data Listing page of the calculator (Fig 2), this need not necessarily be taken literally. The reason for input data limitations is to ensure that the stress concentration factors fall within the expected 5% error margin. However, if the input data is close but outside the limits provided, the resultant factors may still be acceptable dependent upon the level of accuracy you are looking for.
In order to save calculation time, CalQlata has included all stress concentrations for any given shape in the same calculation option. However, you will notice that a particular input combination may be 'valid' for one stress concentration but 'not valid' for others. This is due to the fact that some of the mathematical relationships used to predict a particular factor have a far larger validity range than others. As such, you should ensure that the input data you are using applies to the stress concentration factor(s) for which you need a result(s).
Root Radius
When entering a value for the root radius (r) in a groove or notch in the stress concentration calculator that is not smooth and even, you should try to establish a realistic value for the smallest actual radius in the root or any significant nicks or cuts. Whilst it is unusual to use root radii less than 0.025mm (0.001 inches) in general fabrications and machined parts, the formulas in this calculator apply equally well to radii of molecular dimensions in the evaluation of surface cracks in specialist materials such as glass fibres.
Flat: One U-Notch
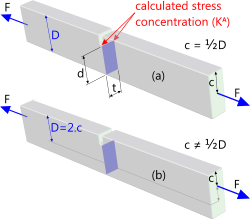
Fig 3. One Notch in Flat Bar
This is a calculation for a flat bar with parallel sides and a U-shaped groove cut into one of its edges. The concentration factor for tensile stress (Kᴬ) is according to Fig 3(a) where the applied load (F) is either evenly distributed over both ends of the bar or acting at the centre of its ends. In the event the load is applied off-centre (with respect to the notch) (Fig 3(b)) the value you should enter for 'D' in this calculation option should be 2 times 'c'. The stress to which the concentration factor is applied at the root of the notch, however, is calculated the same in both cases 'a' and 'b' (σ = F / t.d).
Whilst the theoretical value for in-line bending stress concentration factors (Kᶦ) is valid for both directions of bending, most structural materials are slightly stronger in compression than tension unless the section thickness is too small to prevent lateral deformation (Fig 4).
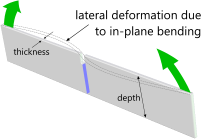
Fig 4. Lateral Deformation
CalQlata suggests that where calculated in-plane bending stresses are greater than 50% of minimum yield, this calculation should be limited to flat bars with a thickness no less than 1/10ᵗʰ of its depth. Therefore, if you are bending 'in-plane' with the notch in compression and the thickness of the bar is greater than 1/10ᵗʰ of its depth, this concentration factor (Kᶦ) can be considered conservative.
As out of plane bending stress is slightly less influenced by notches, this stress concentration factor (Kᴼ) will always be less than the other two.
Flat: Two U-Notches, Flat: One V-Notch, Flat: Two V-Notches, Flat: Fillet
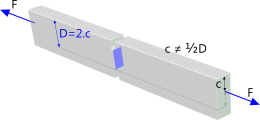
Fig 5. Two Notches in Flat Bar
The same considerations should be given to these calculation options as for Flat: One Notch above. You will notice that the validity ranges for two-notch calculations are much greater than for the one-notch option. This is due to the fact that the calculations apply to symmetrical shapes.
Flat: Hole
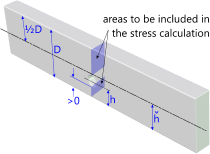
Fig 6. Hole in Flat Bar
This calculation option covers a rectangular flat bar with a complete round hole positioned anywhere between one edge of the bar (>0) and its centre-line (ȟ) but the hole must be complete, as shown in Fig 6, for the calculation to be valid. You may calculate the concentration factor for values of 'h' greater than 'ȟ' and the value may well be accurate, but CalQlata has not verified this option.
Whilst the two out of plane bending stress concentration factors (Kᴼ & Kᵀ) will usually produce similar results within the validity limits, the cylindrical bending (Kᵀ) will always produce smaller concentration factors due to the evenly distributed nature of the bending stress in comparison to that calculated for simple bending stresses (Kᴼ).
Flat: Reinforced Hole
For this calculation to be accurate the reinforcement must be fully welded. Any discontinuity in the join between the reinforcement and the plate on which it is mounted will render the calculation unreliable.
This option provides a concentration factor for axial stress only. You may use the Flat: Fillet calculation option for an out-of-plane bending concentration factor (Kᴼ) and a value of 1 for in-plane bending (Kᶦ).
Plate: Hole
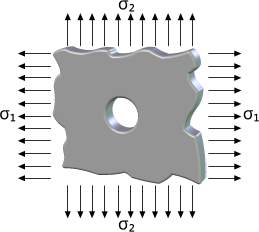
Fig 7. Hole in Flat Plate
The following factors are provided for tensile stresses for a complete hole in an infinitely large plate (Fig 7):
positive stresses in both directions (σ₁⁺ᵛᵉ & σ₂⁺ᵛᵉ): Kᴬ⁺⁺
positive stress in one direction only (σ₁⁺ᵛᵉ): Kᴬ⁺
positive stress in one direction and a negative stress at 90° (σ₁⁺ᵛᵉ & σ₂ˉᵛᵉ): Kᴬ⁺ˉ
In-plane bending stress concentration factors are not included in this calculation option.
Factors are calculated for simple, cylindrical and membrane (Kᴼ, Kᵀ, Kᴹ) out-of-plane bending stresses.
Note: Membrane bending is also referred to as isotropic bending.
Round: U-Groove, Round: V-Groove, Round: Fillet
The same considerations should be given to this calculation option as for Flat: One Notch above.
Tube: Hole
The problem with this shape is that in tubes with relatively thin wall (t/r<0.1) sectional deformation will occur long before yield stress is reached making these calculations unreliable. Therefore, whilst the validity of these options are theoretically acceptable for 0<t/r<0.9 and are thus included in this calculator, CalQlata recommends that you place a validity limitation range on both bending concentration factors (Kᶦ, Kᴼ) of 0.1<t/r<0.9 for this calculation option.
Applicability
All factors (Kᴬ, Kᶦ, Kᴼ) calculated in the stress concentration calculator apply to elastic stresses.
Where the application of factors indicate stresses exceeding yield, this condition will only apply to the immediate locality of the discontinuity. Surrounding areas of the material will gradually but quickly decrease to nominal stress levels (K=1) away from the discontinuity.
Accuracy
As mentioned above (Credibility), if you keep your input data inside the suggested validity limits, CalQlata expects the accuracy of these factors to be within ±5% and increasing the further you deviate from them. However, all such calculations are dependent upon perfectly predictable shape discontinuities and material integrity and can never be as accurate as empirical testing⁽²⁾.
Notes
- Whilst mathematics can be used to predict stress concentrations due to material discontinuities, it can and should only be used where the joining methods and the resultant material property changes are known and fully controlled
- Accurate values for 'K' can only be achieved by testing representative samples
- See references below
Further Reading
You will find further reading on this subject in reference publications(1, 3, 4, 7, 10 & 33)

