Installation Procedure
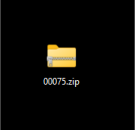
Fig 1. Step 1
Step 1)
Having downloaded your copy of the calculator, it will appear as a zip file in your "Documents" folder (C:\Users\Name\Documents) (Fig 1).
If you do not download your calculator at the time of purchase, you will have up to three days to download it via the link provided in your automatic email. If you do not download it during the three-day relief period, you will need to contact CalQlata for a copy, which will require a friendly email server. Many Company servers will block emails with zip and/or program attachments. We can issue a copy by Dropbox, but that too will require a friendly email server.
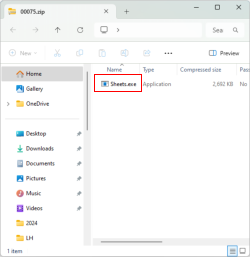
Fig 2. Step 2
Step 2)
You double-click the zip folder and a Window will appear containing your calculator installation file (Fig 2).
This is an execution file (.exe) an operational program in itself, it contains the calculator software. You may run it from anywhere on your PC, including your "Documents" folder. You are advised to keep a copy of this installation file somewhere safe, in case you need to re-install it at a later date.
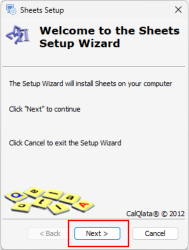
Fig 3. Step 3
Step 3)
You double-click on the installation file and your first installation Window will appear (Fig 3).
Whilst this step is provided for 'information only', offering you another opportunity to cancel the installation process, you may find your anti-virus software will block the installation process at this stage, stating that the calculator is a threat. CalQlata products do not contain viruses. Blocking is purely a default action by your anti-virus software. If this occurs, you will need to reduce your security software protection level to install the calculator, and perhaps identify the calculator as safe, dependent upon you software.
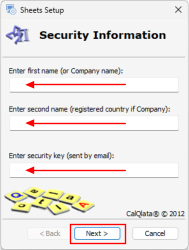
Fig 4. Step 4
Step 4)
You click the "Next" button (Fig 3) and your security Window will appear (Fig 4).
You enter the names and security key (provided in your automated email) in the nominated text-boxes. It may be necessary to copy and paste the data via 'Notepad' to clear any formatting.
You may find problems with this process if you have not used ANSI characters in your names. Should this occur, you will need to contact CalQlata for a revised security key and new names that comprise ANSI characters.
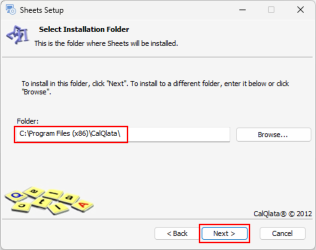
Fig 5. Step 5
Step 5)
You click the "Next" button (Fig 4), and your file location option Window will appear (Fig 5).
Whilst you may install the calculator wherever you wish, we suggest that you leave the default location as-is. You may have problems if you try to install the calculator on a different drive to "C:", where the Data File is located.

Fig 6. Step 6
Step 6)
You click the "Next" button (Fig 5), and your installation Window will appear (Fig 6).
This step is also provided for 'information only', offering you yet another opportunity to cancel the installation process.
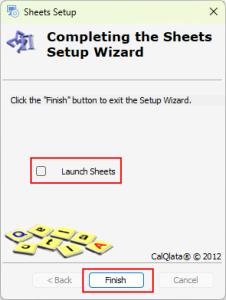
Fig 7. Step 7
Step 7)
You click the "Install" button (Fig 6), and an installation progress window will appear, followed by the completion Window (Fig 7).
It is important that you install our calculators on privately owned machines, that you are logged on as an administrator, and that your machine is not connected to a Company network. If you do install the calculator on a Company owned machine, the calculator will not run.
If you wish to operate one of our calculators on a Company owned machine, you will need to purchase a multi-user licence, however, our contributors rarely allow CalQlata to sell to Companies.

Fig 8. Step 8
Step 8)
You tick the "Launch ..." box (if you wish) and click the "Finish" button (Fig 7). Your program will appear if "Launch ..." was ticked, otherwise; nothing.
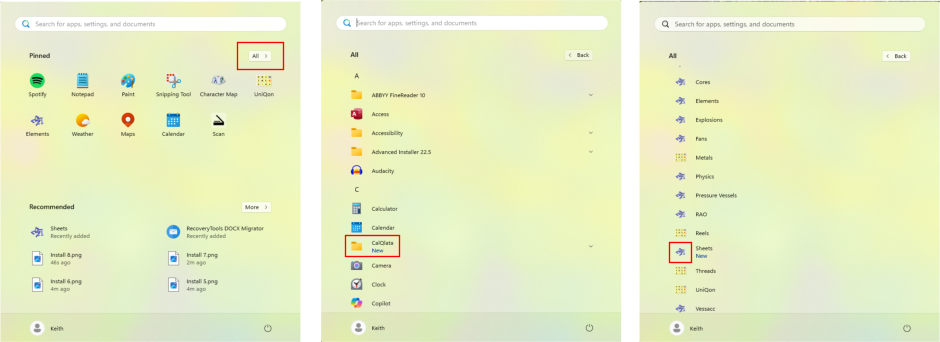
The default condition for this Window is for the "Launch ..." button to remain unticked, therefore you will need to tick it yourself if you wish to run the calculator immediately after installation. Access to the calculator after installation is via the "Start" icon on your 'Task-Bar' (Fig 8).
Step 9)
You will then access your calculator via the "All >" option; the "CalQlata" folder; and click the calculator icon (Fig 9).
Very occasionally (usually never), you may find that Windows decides to corrupt the registry key value for window positioning. You will know if this occurs because the icon will appear on your 'Task Bar' but the programs does not appear on your screen. If this occurs, you will need to correct this manually. It only takes a minute and the process is quite simple; we have provided a dedicated web-page for this process.
Step 10)
We also provide a Troubleshooting page for any other installation or operating problems.